Parallel Computing Overview
We will start the tutorial with a brief overview on parallel computing concepts:
Overview of Parallel Computing
Installation of mpi4py
We will be using the MPI for Python package mpi4py. If you have a clean geo_scipy environment as described on Ryan's Python installation notes on this website, you should be able to install it without any issues using conda. The first thing to do is to open a terminal shell and activate geo_scipy:
source activate geo_scipy
(or you can launch it from the Anaconda app)
Then install mpi4py:
conda install mpi4py
What is mpi4py?
MPI for Python provides MPI bindings for the Python language, allowing programmers to exploit multiple processor computing systems. mpi4py is is constructed on top of the MPI-1/2 specifications and provides an object oriented interface which closely follows MPI-2 C++ bindings.
Documentation for mpi4py
The documentation for mpi4py can be found here: https://mpi4py.scipy.org/
However, it is still a work in progress and much of it assumes you are already familiar with the MPI standard. Therefore, you will probably also need to consult the MPI standard documentation:
The MPI docs only cover the C and Fortran implementations, but the extension to Python syntax is straightforward and in most cases much simpler than the equivalent C or Fortran statements.
Another useful place to look for help is the API reference for mpi4py:
https://mpi4py.scipy.org/docs/apiref/mpi4py.MPI-module.html
In particular, the section for Class Comm lists all the methods you can use with a communicator object:
https://mpi4py.scipy.org/docs/apiref/mpi4py.MPI.Comm-class.html
## Running Python Scripps with MPI
Python programs that use MPI commands must be run using an MPI interpreter, which is provided with the command mpirun. On some systems this command is instead called mpiexec and mpi4py seems to include both.
Make sure your environment is correct by checking that mpirun is in your anaconda directory for geo_scipy by using the which Unix comamnd:
$ which mpirun
/anaconda/envs/geo_scipy/bin/mpirun
You can run a MPI Python script using the mpirun command as follows:
mpirun -n 4 python script.py
Here the -n 4 tells MPI to use four processes, which is the number of cores I have on my laptop. Then we tell MPI to run the python script named script.py.
If you are running this on a desktop computer, then you should adjust the -n argument to be the number of cores on your system or the maximum number of processes needed for your job, whichever is smaller. Or on a large cluster you would specify the number of cores that your program needs or the maximum number of cores available on the particular cluster.
Communicators and Ranks
Our first MPI for python example will simply import MPI from the mpi4py package, create a communicator and get the rank of each process:
from mpi4py import MPI

comm = MPI.COMM_WORLD
rank = comm.Get_rank()
print('My rank is ',rank)
Save this to a file call comm.py and then run it:
mpirun -n 4 python comm.py
Here we used the default communicator named MPI.COMM_WORLD, which consists of all the processors. For many MPI codes, this is the main communicator that you will need. However, you can create custom communicators using subsets of the processors in MPI.COMM_WORLD. See the documentation for more info.
Point-to-Point Communication
Now we will look at how to pass data from one process to another. Here is a very simple example where we pass a dictionary from process 0 to process 1:
from mpi4py import MPI
import numpy

comm = MPI.COMM_WORLD
rank = comm.Get_rank()

if rank == 0:
    data = {'a': 7, 'b': 3.14}
    comm.send(data, dest=1)
elif rank == 1:
    data = comm.recv(source=0)
    print('On process 1, data is ',data)
Here we sent a dictionary, but you could also send an integer with a similar code:
from mpi4py import MPI
import numpy

comm = MPI.COMM_WORLD
rank = comm.Get_rank()

if rank == 0:
    idata = 1
    comm.send(idata, dest=1)
elif rank == 1:
    idata = comm.recv(source=0)
    print('On process 1, data is ',idata)
Note how comm.send and comm.recv have lower case s and r.
Now let's look at a more complex example where we send a numpy array:
from mpi4py import MPI
import numpy as np

comm = MPI.COMM_WORLD
rank = comm.Get_rank()

if rank == 0:
    # in real code, this section might
    # read in data parameters from a file
    numData = 10
    comm.send(numData, dest=1)

    data = np.linspace(0.0,3.14,numData)
    comm.Send(data, dest=1)

elif rank == 1:

    numData = comm.recv(source=0)
    print('Number of data to receive: ',numData)

    data = np.empty(numData, dtype='d')  # allocate space to receive the array
    comm.Recv(data, source=0)

    print('data received: ',data)
Note how comm.Send and comm.Recv used to send and receive the numpy array have upper case S and R.
Collective Communication
Broadcasting:
Broadcasting takes a variable and sends an exact copy of it to all processes on a communicator. Here are some examples:
Broadcasting a dictionary:
from mpi4py import MPI

comm = MPI.COMM_WORLD
rank = comm.Get_rank()

if rank == 0:
    data = {'key1' : [1,2, 3],
            'key2' : ( 'abc', 'xyz')}
else:
    data = None

data = comm.bcast(data, root=0)
print('Rank: ',rank,', data: ' ,data)
You can broadcasting a numpy array using the Bcast method (again note the capital B). Here we will modify the point-to-point code from above to instead broadcast the array data to all processes in the communicator (rather than just from process 0 to 1):
from mpi4py import MPI
import numpy as np

comm = MPI.COMM_WORLD
rank = comm.Get_rank()

if rank == 0:
    # create a data array on process 0
    # in real code, this section might
    # read in data parameters from a file
    numData = 10
    data = np.linspace(0.0,3.14,numData)
else:
    numData = None

# broadcast numData and allocate array on other ranks:
numData = comm.bcast(numData, root=0)
if rank != 0:
    data = np.empty(numData, dtype='d')

comm.Bcast(data, root=0) # broadcast the array from rank 0 to all others

print('Rank: ',rank, ', data received: ',data)
Scattering:
Scatter takes an array and distributes contiguous sections of it across the ranks of a communicator. Here's an image from http://mpitutorial.com that illustrates the difference between a broadcast and scatter:

Let's try an example now.
from mpi4py import MPI
import numpy as np

comm = MPI.COMM_WORLD
size = comm.Get_size() # new: gives number of ranks in comm
rank = comm.Get_rank()

numDataPerRank = 10
data = None
if rank == 0:
    data = np.linspace(1,size*numDataPerRank,numDataPerRank*size)
    # when size=4 (using -n 4), data = [1.0:40.0]

recvbuf = np.empty(numDataPerRank, dtype='d') # allocate space for recvbuf
comm.Scatter(data, recvbuf, root=0)

print('Rank: ',rank, ', recvbuf received: ',recvbuf)
In this example, the rank 0 process created the array data. Since this is just a toy example, we made data be a simple linspace array, but in a research code the data might have been read in from a file, or generated by a previous part of the workflow. data is then scattered to all the ranks (including rank 0) using comm.Scatter. Note that we first had to initialize (or allocate) the receiving buffer array recvbuf.
Gathering:
The reverse of a scatter is a gather, which takes subsets of an array that are distributed across the ranks, and gathers them back into the full array. Here's an image from http://mpitutorial.com that illustrates this graphically:

For an example, here is a code that does the reverse of the scatter example above.
from mpi4py import MPI
import numpy as np

comm = MPI.COMM_WORLD
size = comm.Get_size()
rank = comm.Get_rank()

numDataPerRank = 10
sendbuf = np.linspace(rank*numDataPerRank+1,(rank+1)*numDataPerRank,numDataPerRank)
print('Rank: ',rank, ', sendbuf: ',sendbuf)

recvbuf = None
if rank == 0:
    recvbuf = np.empty(numDataPerRank*size, dtype='d')

comm.Gather(sendbuf, recvbuf, root=0)

if rank == 0:
    print('Rank: ',rank, ', recvbuf received: ',recvbuf)
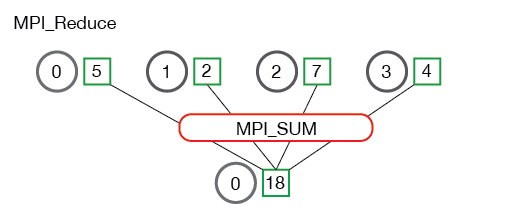
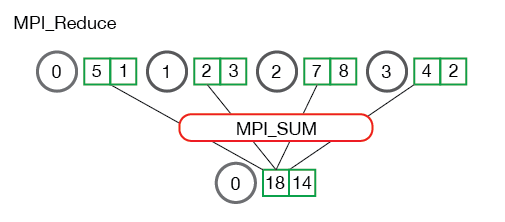
Reduction:
The MP reduce operation takes values in from an array on each process and reduces them to a single result on the root process. This is essentially like having a somewhat complicated send command from each process to the root process, and then having the root process perform the reduction operation. Thankfully, MPI reduce does all this with one concise command.
For numpy arrays, the syntax is
~~~python
comm.Reduce(send_data, recv_data, op=send_data is the data being sent from all the processes on the communicator and recv_data is the array on the root process that will receive all the data. Note that the send and recv arrays have the same size. All the copies of data in send_data will be reduced according to the specified <operation>. A few commonly used operations are:
- MPI_SUM - Sums the elements.
- MPI_PROD - Multiplies all elements.
- MPI_MAX - Returns the maximum element.
- MPI_MIN - Returns the minimum element.
Here's a few more useful images from http://mpi_thttp://mpitutorial.com that illustrate the reduce step graphically:
And here is a code example:
from mpi4py import MPI
import numpy as np

comm = MPI.COMM_WORLD
rank = comm.Get_rank()

# Create some np arrays on each process:
# For this demo, the arrays have only one
# entry that is assigned to be the rank of the processor
value = np.array(rank,'d')

print(' Rank: ',rank, ' value = ', value)

# initialize the np arrays that will store the results:
value_sum      = np.array(0.0,'d')
value_max      = np.array(0.0,'d')

# perform the reductions:
comm.Reduce(value, value_sum, op=MPI.SUM, root=0)
comm.Reduce(value, value_max, op=MPI.MAX, root=0)

if rank == 0:
    print(' Rank 0: value_sum =    ',value_sum)
    print(' Rank 0: value_max =    ',value_max)