Here we will learn how to launch a jupyter notebook on Habanero and connect to it via an ssh tunnel. It would be possible to automate all of this, but it is instructive to go through the steps manually.
Login
Login to Habanero by using the ssh command in a unix shell:
ssh <UNI>@habanero.rcs.columbia.edu
where you replace <UNI> with your UNI.
Check to see where your home directory is:
[kwk2115@holmes ~]$ pwd
/rigel/home/kwk2115
Load Environment
In the Intro to Habanero,
you configured an environment called geo_scipy. You should activate it again.
$ module load anaconda
$ source activate geo_scipy
Configure notebook security
Jupyter notebook servers can include a password for security. This step is especially important in a shared environment, to ensure that other users can't access your notebook. To create a password, first we generate the Jupyter config file
jupyter notebook --generate-config
This created a file in ~/.jupyter/jupyter_notebook_config.py. If you open
that file and search for "password", you'll see a line like the following:
#c.NotebookApp.password = u''
The instructions in the comments of the config file tell you to generate a hashed password by entering the following commands:
$ ipython
In [1]: from notebook.auth import passwd; passwd()
Enter password:
You can enter a password of your choice, and it will return to you a hashed password that encodes the same information, but is safe to include in a publicly accessible config file. I entered "password" (do not do this) and go the following output:
Out[1]: 'sha1:69a76df803b9:99ca27341563cd85ba4e78684128e1f4ad2d8d0d'
Copy that string into the clipboard, then open your jupyter_notebook_config.py
config file in a text editor (vim, nano, or emacs). Find the password line and
paste the hashed password.
c.NotebookApp.password = u'sha1:69a76df803b9:99ca27341563cd85ba4e78684128e1f4ad2d8d0d'
Security is now configured for your notebook.
Launch a notebook on a compute node
You should not use the login nodes for any data analysis tasks. The jupyter
notebook needs to be launched on a compute node. We need to create a jobscript
that will allow us to launch a notebook. Open a text editor (vim, nano, emacs)
on a new filed called launch-notebook.sh and type in the following lines
1 2 3 4 5 6 7 8 9 10 11 12 13 14 15 16 | #!/bin/bash
#SBATCH --account=edu
#SBATCH --reserverpation=edu_15
#SBATCH -J notebook
#SBATCH --time=6:00:00
# Setup Environment
module load anaconda
source activate geo_scipy
export XDG_RUNTIME_DIR=""
jupyter notebook --no-browser --ip "*" \
--notebook-dir $HOME
|
Once this file has been created, use it to launch a batch job
$ sbatch launch-notebook.sh
Check on the status of your job
$ squeue -u $USER
If you job has launched, you will see something like this
JOBID PARTITION     NAME     USER ST       TIME  NODES NODELIST(REASON)
3759794      edu1 notebook   ra2697  R      34:12      1 node163
Connect to your notebook
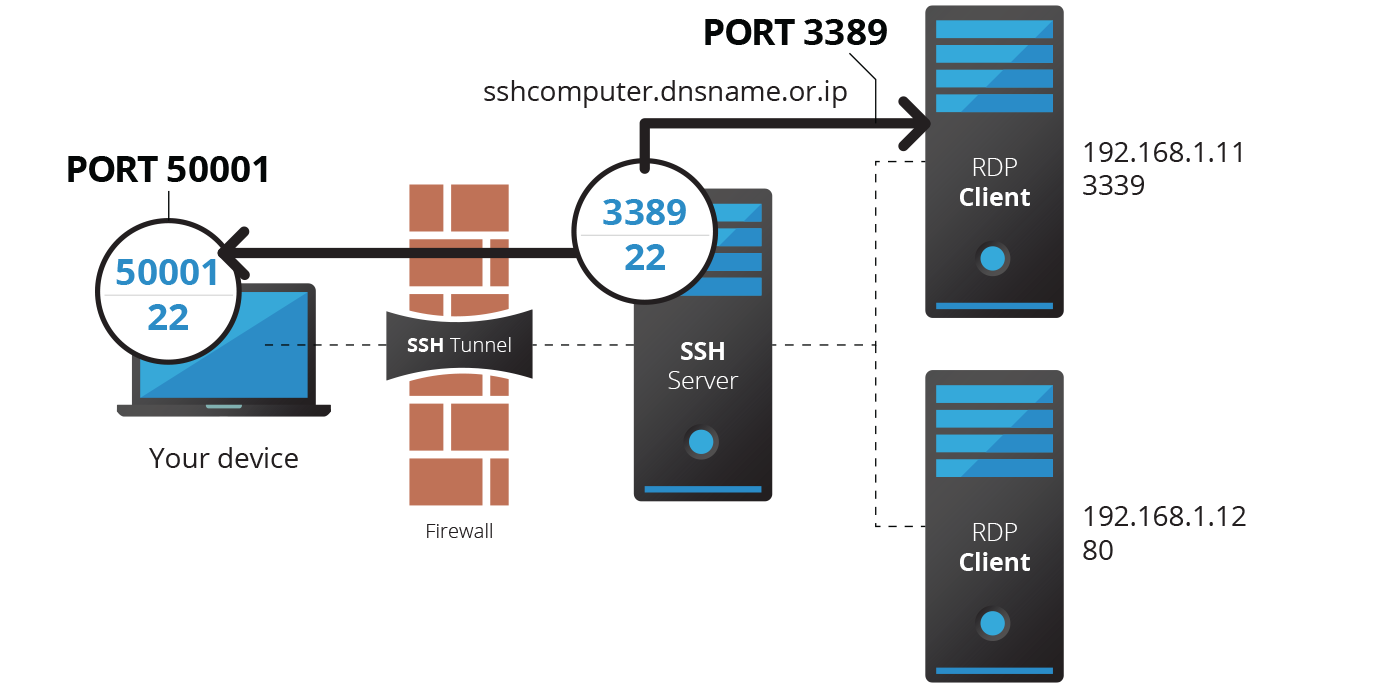
Our notebook is now running on the compute node. The only problem is, we can't connect to it! Compute nodes are hidden behind a firewall and can't accept incomming connections. We need to use an ssh tunnel. An ssh tunnel allows us to connect to a remote port via an ssh connection, as illustrated in this diagram
First we need to find out the hostname where the notebook is running. We get
this from the squeue command, under the nodelist column. The hostname is
node163. Then we need to know the remote port where the job is running.
By default this is 8888, but, if there are other notebook servers on the same
node, it may be different. To check for sure, we can look in the log file
from our batch job. In this case it is a file called slurm-3759794.out. We
type
$ grep Notebook slurm-<JOBID>.out
(replace
This gives
[I 09:17:30.525 NotebookApp] Serving notebooks from local directory: /rigel/home/ra2697
[I 09:17:30.525 NotebookApp] 0 active kernels
[I 09:17:30.525 NotebookApp] The Jupyter Notebook is running at:
[I 09:17:30.526 NotebookApp] http://[all ip addresses on your system]:8888/
[I 09:17:30.526 NotebookApp] Use Control-C to stop this server and shut down all kernels (twice to skip confirmation).
The second to last line shows that port 8888 is correct.
Now, from our local machine, we create a new ssh connection with tunnels
$ ssh -L 9999:node163:8888 <UNI>@habanero.rcs.columbia.edu
We can open the notebook connection at http://localhost:9999.